Git, project management tools, and the terminal
24 Aug 2015How to approach a project
When you're given a project to work on, the natural inclination is to dive right into writing the code--that's the fun part, after all! Resist that temptation, though: things will go much more smoothly for you and your team if you take the time to get organized and figure out how you're going to approach the problem you've been given.
The tools you use to come organize your ideas are up to you. We all have some favorite tools, and as you do more and more of this, you'll come up with your own set. Paper is a great place to start out if you're not working remotely--it's hard to beat the tactile nature of it, and by this point the uI has been pretty well hammered out.
Mind maps are really useful as well--there is free mind-mapping software available for every OS out there, and a bunch more available on the web. These are very helpful for figuring out the connections between various parts of your code.
- Labyrinth is a great option for Linux; it's what I use.
- Mindmup looks like a reasonable web-based mind mapper.
If your project has any kind of graphical components, it's a great idea to come up with a wireframe--these are basically sketches of what the page will look like. No fonts, no images, no colors--just outlines showing where all the different text boxes, buttons, form entry fields, and everything else will be. Doing this helps you ensure that you haven't forgotten any important bits of functionality, eg "oh, this shows a 'login' button. That means we need to be able to log people in!"
- Moqups is a fine free web-based wireframe sevice.
Once you have a good idea of what needs to be done, you can start to figure out who is doing what parts. How jobs get doled out is completely up to your group--the important part is to be sure that everyone has a good idea of what they should be doing, and of how their tasks will interact with the tasks of other people on the team.
Working in the Terminal
There are GUI options for just about everything you'll want to do in coding, but it's always a good idea to be comfortable working in the terminal--the GUI you like may be different than the one your workplace uses, or you may be SSHing into a server that doesn't have a GUI available. If you're comfortable using the terminal, these won't be problems--and the more you use the terminal, the more you'll resent having to move your hand all the way over to your mouse! For starters, let's have a look at the commands on this handy cheat sheet.
Git and GitHub
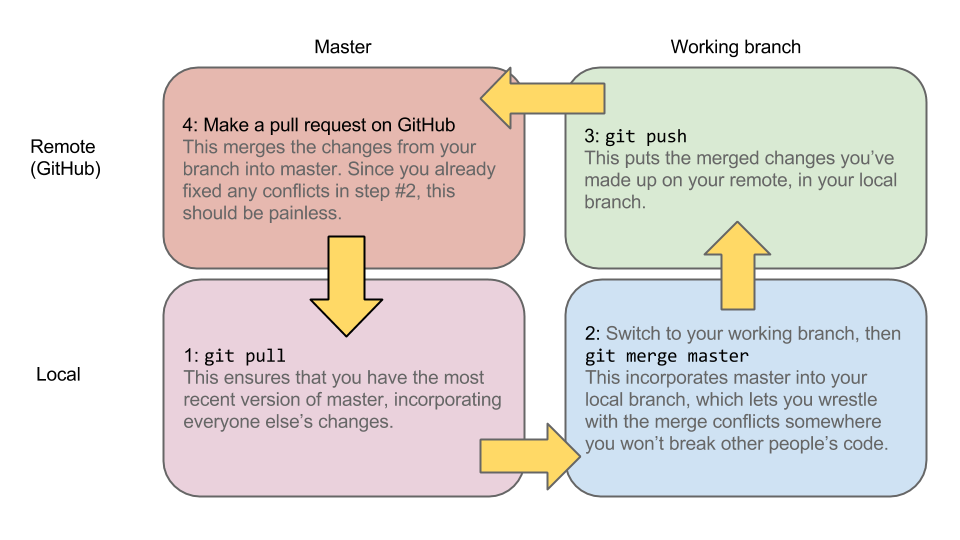
Version control probably the single most important part of getting your project organized. It ensures that there's a trustworthy record of your entire project history available to anyone who needs it, and it allows many people to work together on big projects without stepping on each other's toes and overwriting code. If you don't have Git installed, it's available here. Windows users will want to pick up Git Bash.
There is some configuration that you'll want to do with Git in order to make things run smoothly. For starters, we'll have to make sure line endings are being dealt with properly. For Linux and OS X users, you'll want to enter git config --global core.autocrlf input, while Windows users will want git config --global core.autocrlf true.
Next, you'll want to create a global .gitignore file. This is a file that tells Git not to bother with the files that you specify. You can have a separate .gitignore for each project, but setting up a good global .gitignore can make your life a lot easier. You can create that file with the command touch ~/.gitignore_global, and then tell Git about it with git config --global core.excludesfile ~/.gitignore_global. All you need to do after that is identify the files that you'll never want to have in a repository and list them in that file. There's a great starter .gitignore available here.
Finally, you can set Git up to automatically use your text editor of choice for things like commit messages and merge conflicts. Git will probably default to Vim; if that's not your cup of tea, you can use:
- atom:
git config --global core.editor "atom --wait" - sublime:
git config --global core.editor "subl -n -w"
One of the many great things that GitHub brings to Git is a built-in Issue tracker. This is designed so that as users find bugs in your software, you can assign tickets to the various team members to assign who is working on what problems. This is handy enough on its own, but in conjunction with the Chrome plugin ZenHub, it becomes a pretty serious project management tool--definitely worth picking up.
Git is what you use on your machine to manage your code. In order to work with a team, you'll need to store that code repository somewhere that everyone has access to. Much of the time, that remote repo will be stored somewhere on the internet. There are many places online that will let you store your repositories for free, but the most well-known of them is definitely GitHub. Once you've got a GitHub account, you can manage repositories. There is one bit of configuration that you'll find handy: set up your GitHub account to authenticate with SSH. This involves some fancy cryptography and a "key" that you store on your computer, but the upshot of it is that you don't have to enter your password all the time, which is definitely worth a potentially annoying setup. There are good instructions available here
Git Workflow
Exercise: Merge conflicts!
One of the things that you will inevitably have to deal with when using Git is merge conflicts. These happen when you change the same code that someone else did, and Git can't figure out whose code to keep. In order to give you some exposure to these in a friendly setting, we've created a repo that you can fork and then clone to see how merge conflicts work. The first thing you'll need to do is log in to GitHub, then go to this repo and fork it. That will create a copy of the repo on your account, which means that you have permissions to push to it and can do so without changing the original repo for everyone else.
Once you've forked the repo, open up the terminal and navigate to the directory where you want to keep all of your projects for class--for example, mine is ~/coding/javascript/pcs. Feel free to use whatever structure works for you. The important point here is that you don't need to create a directory specifically for this projet--the next step will take care of that for us. Once you're where you want the new directory to be, click on the "clone URL" clipboard icon on the right-hand side of the page on GitHub--but make sure you're using SSH instead of HTTPS first! Then go back into the terminal and type git clone followed by a space and the URL that you copied from GitHub. You should end up with something like git clone git@github.com:TomMcCluskey/cards-merge.git. Then hit return, and that repo will be downloaded to your local system.
Next, change directory into the folder that just got downloaded. If you do git branch -a you'll be able to see all of the branches that are being tracked. You'll just have to make some local branches to track them with a command like git checkout -b closure-ctor origin/closure-ctor. This is telling git to create a new local branch called "closure-ctor" and to switch to it, and also to make sure that branch syncs with the "closure-ctor" branch on GitHub. Do that for the other branch as well--you should end up with three branches (counting master) when you do git branch.
The final step will be creating a merge conflict! From the master branch, pick one of the other two branches and do git merge <first branch name>. That should go smoothly. When you then do git merge <second branch name>, though, you should get a merge conflict in the cards.js file. Nice work! Now we get to have fun: open up the cards.js file, and resolve the merge conflicts! Keep at it until you have a working version of Cards.
Project Of The Week: Sudoku Solver
For the first week's project, you'll be building an application that solves Sudoku puzzles. More details will follow soon, but here's a broad outline.
This project will have 4 modules, each implementing a constructor:
DigitSet: each instance of a DigitSet will represent a subset of 9 possible characters '1'-'9'. Each set of digits should be unordered and have no duplicates; that is, each each possible digit is either present or absent from the set. You'll need this to represent the partial knowledge available in each Sudoku square.
Grid: each Grid instance will represent a 9x9 grid of squares, each holding a known digit or a set of possible digits. Each square belongs to three different groups: a row, a column, and a 3x3 block.
This object will have methods for retrieving certain squares and groups, for getting and setting the possible digits in each square, and for importing and exporting the entire grid into other formats.
Viewer: a viewer instance will be responsible for the display of a board, with various methods to represent its board as a string or, eventually, a browser graphic.
Solver: a solver instance will be able to deduce the contents of uncertain squares and eventually solve the entire grid.
You will be responsible for writing the first three modules, DigitSet, Grid, and Viewer, according to a specification which will be compatible with a Solver. On Tuesday, we'll explore precisely what a "module" is and how they work together in projects.
As part of your development process, you'll need to write tests which validate the behavior of your modules. On Wednesday, we'll talk about writing test with Mocha and Chai, frameworks for testing and assertions.
On Thursday, we'll provide at least an initial version of a Solver which should be able to solve the Sudoku puzzles encoded in your Grid and use your Viewer to display it.
Glossary
square or cell: one of the 81 spaces holding a single digit
block: one of the nine 3x3 grids of adjacent squares
row: one of the nine 1x9 rows of squares
column or col: one of the nine 9x1 columns of squares
group: a set of nine squares, either a row, column, or block. Each square on the board will belong to three groups, one of each type.
token: any Javascript value which is proprietary to your module but held temporarily by another module (e.g. the Solver). Your token will be generated by one of your own methods and given back as an argument to other methods; only your module knows its format and interpretation. A token may be a primitive (e.g. string or number) or any kind of object, including Arrays.
Module APIs
DigitSet constructor
new DigitSet() --> digitSet instance
new DigitSet(singleDigit) --> digitSet instance
DigitSet instance methods
digitSet.size() --> integer 0-9
Grid constructor
new Grid(initString) --> grid instance
Grid instance methods
grid.cells() --> Array of all cell tokens
grid.cells(groupToken) --> Array of cell tokens associated with groupToken
grid.groups() --> Array of all group tokens
grid.groups(cellToken) --> Array of all group tokens associated with cellToken
grid.getPossible(cellToken) --> digitSet
Viewer constructor
new Viewer(grid) --> viewer instance
Viewer instance methods
viewer.showFinished() --> string depicting 9x9 grid of digits known with certainty