Introduction
Way back in the beginning of this course, we broke down things this way:
- HTML took care if both content and structure
- CSS did the appearance
- JavaScript provided interaction
We need to take one more step and separate content from structure.
We will create our HTML with placeholders instead of content, creating templates. Then, we will use software to take the content, our text and media, and inject it into the templates, and publish our websites.
There are, in general, two ways to do this:
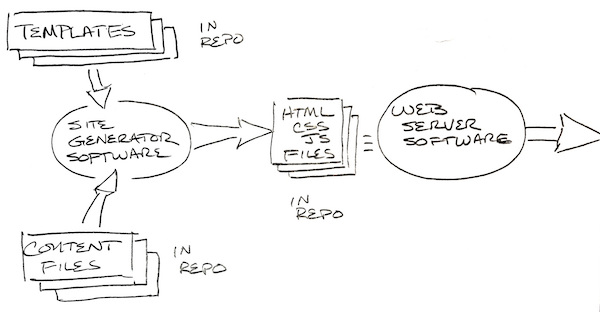
- Beforehand: taking all the content, injecting it into the HTML and then saving all those HTML files on the Web server. This is called site generation.
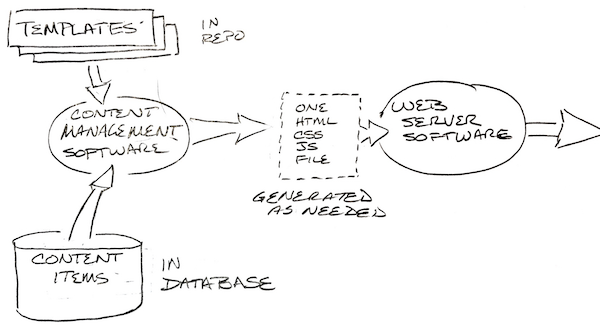
- On the fly: having all of our content in a database and creating HTML pages on-the-fly when users visit the site. The software that accomplishes this is called a content management system.
Templating Languages
The first step, down at the coding level, is to take the content out of the HTML and just leave placeholders. Here’s an example in the Liquid templating langage:
<div id="main" role="main">
  <div class="article-author-side">
    <p>Joe Smith is a famous blogger who's opinions inexplicably matter to people. </p>
  </div>
  <article>
    <h1>How to be a blogger</h1>
    <div class="article-wrap">
      <p>It's pretty easy to be a blogger. Go to a site like <a href="http://chrisvalleskey.com/fillerama/">Fillerama</a>, click a few buttons, get some text like this...</p>
		  <i><p>Hokey religions and ancient weapons are no match for a good blaster at your side, kid. You don't believe in the Force, do you? Alderaan? I'm not going to Alderaan. I've got to go home. It's late, I'm in for it as it is. You're all clear, kid. Let's blow this thing and go home! The plans you refer to will soon be back in our hands. You're all clear, kid. Let's blow this thing and go home!</p>
      <p>... and hey, presto, you're a blogger!</p></i>
    </div>
  </article>
</div>
Here’s what it looks like as a template:
<div id="main" role="main">
  <div class="article-author-side">
    {{ author-bio }}
  </div>
  <article>
    <h1>{{ title }}</h1>
    <div class="article-wrap">
      {{ content }}
    </div>
  </article>
</div>
Notice that all the content (author biography, article title, article body) has been replaced with placeholders, like this:
{{ author-bio }}
{{ title }}
{{ content }}
The actual content is kept in either simple text files or in a database.
Advantages
The advantages of using templates in either site generation or content management systems are these:
- You can re-use the same template to create many articles, blog entries, or pages
- You can focus the HTML on the structure of the material
- The people who create content do not have to understand coding - HTML, CSS, or JavaScript. They just need to type in the text. They can focus on the content.
Key Differences between site generators and content management systems
Both site generators and content management systems use templates to separate content from structure. But, in general, there are some key differences:
Site generators:

- Store content in files (or, in some cases, databases)
- Publish the web site as static HTML, CSS, & JavaScript files once for each content update
- Separate HTML templates from CSS stylesheets
- Are “closer to the code”
Content management systems:

- Store content in databases
- Publish each page of the web site as it is requested by the web server
- Combine HTML templates and CSS stylesheets into themes
- Are easier for non-coders to use
Wordpress
- The most popular open source content managment system.
- Built from HTML, CSS, JavaScript and PHP (a simple server side programming and templating language similar to JavaScript, Perl and other functional languages).
- Built on top of any operating system and SQL-based database (Like Linux and PostgeSQL, both open source and very scalable.)
- Provides an admin area to manage and grow the site
- Plug-in architecture to provide additional features
- Plug-in market to encourage people to contribute plug-ins for free and as a business
- Themes allow customization
- Many theme markets available to get themes for free and for cost
- Lots of support from extensive community
No need to work with the code. The backed admin area is pretty much the same for all sorts of variety of sites
Why use Wordpress * CMS advantages * Free * Very commonly offered as a one-button install at many ISP’s * Posssible to have complex functionality via plugins and themes without coding
When to choose another development method
- Wordpress is optimized for “posts,” “pages,” and media
- Posts are frequent new infomation organized in a time and tag-based manner, like a blog
- Pages are static content
- You can create custom content types like “product” or “job” and many plugins do this
- If you have a complex application like Customer Relationship Management or Accounting, then you might consider another platform or consider creating a full-stack application of your own
- Wordpress plugins may be able to stretch to provide almost any sort of site, but they are ill-suited to very different applications
- Some sites are too small - no repeating content or no need to update site by non-codersw
Full stack applications
- Client side
- Display
- Interactivity
- Other browser features (like geolocation)
- Server side - at least three layers
- Web server, load balancer, etc.
- “Business rules” - application software that creates and maintains data according to the needs of the site and provides services to the client side
- database - software to reliably store and efficiently retreive large amounts of data
Setting up your first Wordpress site
You can download Wordpress for free from Wordpress.org and set it up on your machine using MAMP. This gives you the most flexibility.
However, for this demonstration, we will set up a free website on WordPress.com.
We are going to set up a blog. If you’re going to become a web developer, one way to prove that you are engaged and capable is to keep a blog of your learning process. Some people are shy about sharing when they don’t understand something, but but there are hundreds and thousands of people out there just like you who would benefit from what you learn. This is your first opportunity to pay forward all of the amazing information there is out on the web.
In this sequence, we will create a free WordPress.org blog site. You can use a temporary email in case you want to throw away this site
Infinite emails
Did you know that Gmail users get an infinite number of addresses?. All you have to do is add a string to your email with a plus sign (“+”). Here’s an example:
- Let’s say you have a gmail account: wonderkid@gmail.com
- Your blog is “A Thousand Steps” and your subdomain is “thousandsteps”. (the URL of your blog is http://thousandsteps.wordpress.org)
- You can use the email wonderkid+thousandsteps@gmail.com and all the email that is sent to this address will be automatically forwarded to wonderkid@gmail.com
Any string works, but it’s useful to associate the email and its purpose.
Steps
- Goto Wordpress.org
- Choose a subdomain that is available
- Provide an email and password
- Examine the paid options. Note that the free option is very limited and carries ads, but it’s good enough for now.
- Click the button!!!
Setup process
- Step 1 - choose a blog title, tagline and language
- Step 2 - choose a free theme. I’m using “Intergalactic.”
- Step 3 - click on “Customize It!”
- Click on the sidebar and explore your customization options. All of these are available later.
- Color - a teaser for premium hosting
- Header - an image
- Title
- Widgets - Additional functionality
- Step 4 - Advertise for Wordpress (Clearly optional).
- Verify your email address
- Write your first blog post
- Think about what your blog is about - the simpler the better - then tag and ategorize your posts.
- Each post can have a “featured image.”
- Use an “excerpt” to draw reader attention to your key point
- Set advanced settings
- Preview, then publish
- Open the admin dashboard by clicking in the upper left corner, on your blog name.
- Explore
- Modify your “about” page.
Tips
- Moderate comments
- Use Akismet to block spam
- Write every day, even if it’s a little post
- When the writing’s easy, create backlogs of posts and publish them later.
- Back up your content
- By signing up at Wordpress.com, you also join a community of other Wordpress users. There are features for participating in the community, like following other blogs.
Where to go from here
- Work through all the Wordpress tutorials
- Do the Treehouse Wordpress sequence
- Read the Codex
Wordpress as a career
Web developers can make a very comfortable living creating Wordpress-based web sites and applications for a wide variety of customers.
- Site design and mild customization (one-time engagement, relatively low income and high volume)
- Site operations, maintenance, and upgrades (ongoing work and income)
- Theme customization (requires understanding HTML, CSS, JavaScript, PHP, the bulk of Wordpress developer work)
- Theme creation - Your creation with a Wordpress infrastructure (complex site gigs, additional income from theme sales)
- Widget and plugin writing - heavy duty coding (additional income)
