Goals
- Set up your git configuration for use with GitHub
- Know why web developers use Git and GitHub
- Initialize a Git repository
- Stage changes to be committed
- Know how and when to commit changes
- Use branching and merging to collaborate on projects
- Initiate pull requests
- Resolve merge conflicts
Prep work
Estimated time: 15 minutes
- Work through Try Git.
Setting up Git and GitHub
Configuration
Set your username and email
$ git config --global user.name "jane doe"
$ git config --global user.email janedoe@example.com
Some more useful settings:
git config --global push.default current
git config --global merge.defaultToUpstream true
git config --global core.editor "subl -w"
Verify your details are set with the -l flag (“l” for “list”)
$ git config --global -lSet up your SSH key (this will allow you to push your repo to GitHub without entering your username and password at the command line)
Step 1:
$ bash -c "$(curl -fsSL http://bit.ly/pcs-git)"Step 2:
Go to http://github.com/settings/ssh (make sure you’ve signed in)
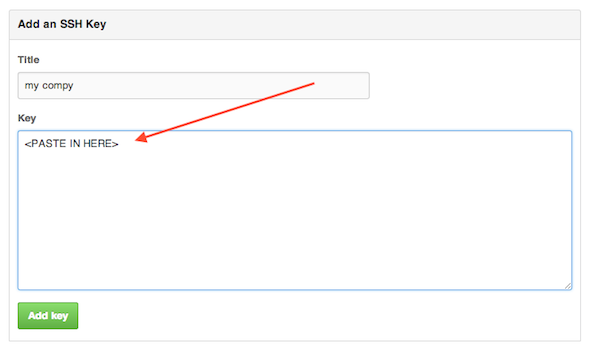
Add your ssh key by clicking on “Add SSH key”

And pasting what’s on your clipboard into the text field below
To test your ssh setup, enter
$ ssh -T git@github.comYou should see the following:
Hi <username>! You've successfuly authenticated, but GitHub
does not provide shell access.
If that <username> is yours, you’ve successfully set up your SSH key with GitHub.
Overview of Git
Some concepts
- working directory: your project’s directory
- index / staging area: where you collect the changes you’re about to commit to the repository
Examples:git add stylesheet2.css stylesheet2.css(stage css files for a commit of styling changes)git add script.js(stage a javascript file for a commit)git add .(stage all modified files for a commit)
- repository (‘repo’): where your project’s version history is stored
git commit -m "Update styling to match v2 wireframes"
A Solo Workflow
- Create a repo on GitHub
- clone the repo
git clone <SSH url from the repo's page on GitHub>

- Add a branch for yourself
git checkout -b <branch name>
- Make changes on your branch
- e.g., to add a signup form to your site
- Add files to track
git add <filenames or .>
- commit your changes
git commit -m "Add a form"(the-mflag means you’re setting the commit message to"Add a form")- Note the imperative form of the message. This is by convention.
- Eventually, as your git-fu grows, you’ll want to start writing more complete commit messages, which look something more or less like this:
50-character-max subject line

72-character-max wrapped longer description. This should answer:

* Why was this change necessary?
* How does it address the problem?
* Are there any side effects?

Include a url to the ticket, if any.
But for now just use a descriptive one-liner using the -m flag.
Git + GitHub for Collaboration
- Create a repo on GitHub
- Authorize collaborators (if you’re the admin)
- All collaborators clone the repo
- Each person creates a new feature branch for a given task or feature
- Each person commits their changes locally
- When a feature is complete, you push to GitHub and issue a pull request
- A “pull request” is where your partners review your work, discuss it, and the project admin merges it into the master branch if approved
5. Basic git commands
### Getting and creating projects
$ git init
$ git clone
Staging and commiting
$ git add <files to stage so they can be committed>
$ git commit -m "<commit message>"
Merging and branching
$ git checkout -b <branch name>
$ git branch
$ git merge <branch name>
Pushing and pulling
$ git push
$ git pull
Viewing current status and past history
$ git status
$ git log